
I have this problem with cakes. It’s a “go big or go home” sort of thing. I believe that the bigger and taller they are, the better. For instance, my Grain-Free Chocolate Mud Cake (which is also used in the layers of this Halloween cake) and my 14-Layer Chocolate Strawberry Cake. Big, tall cakes.
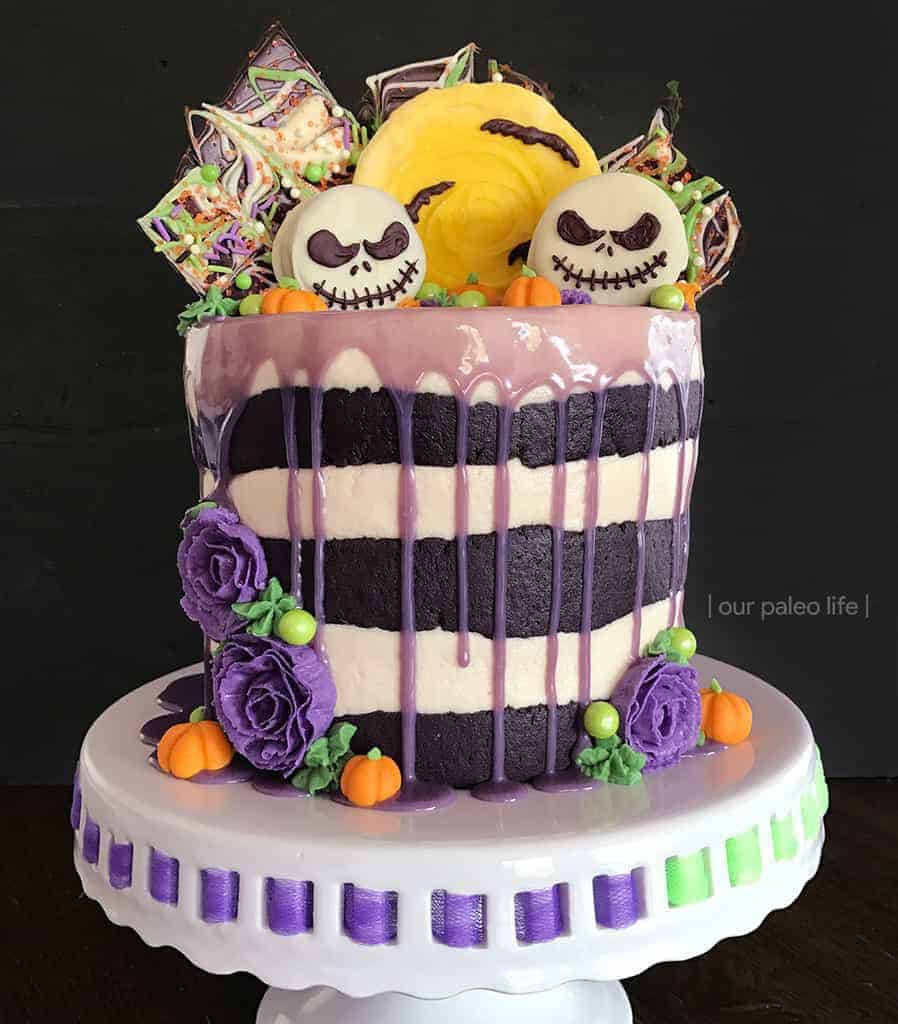

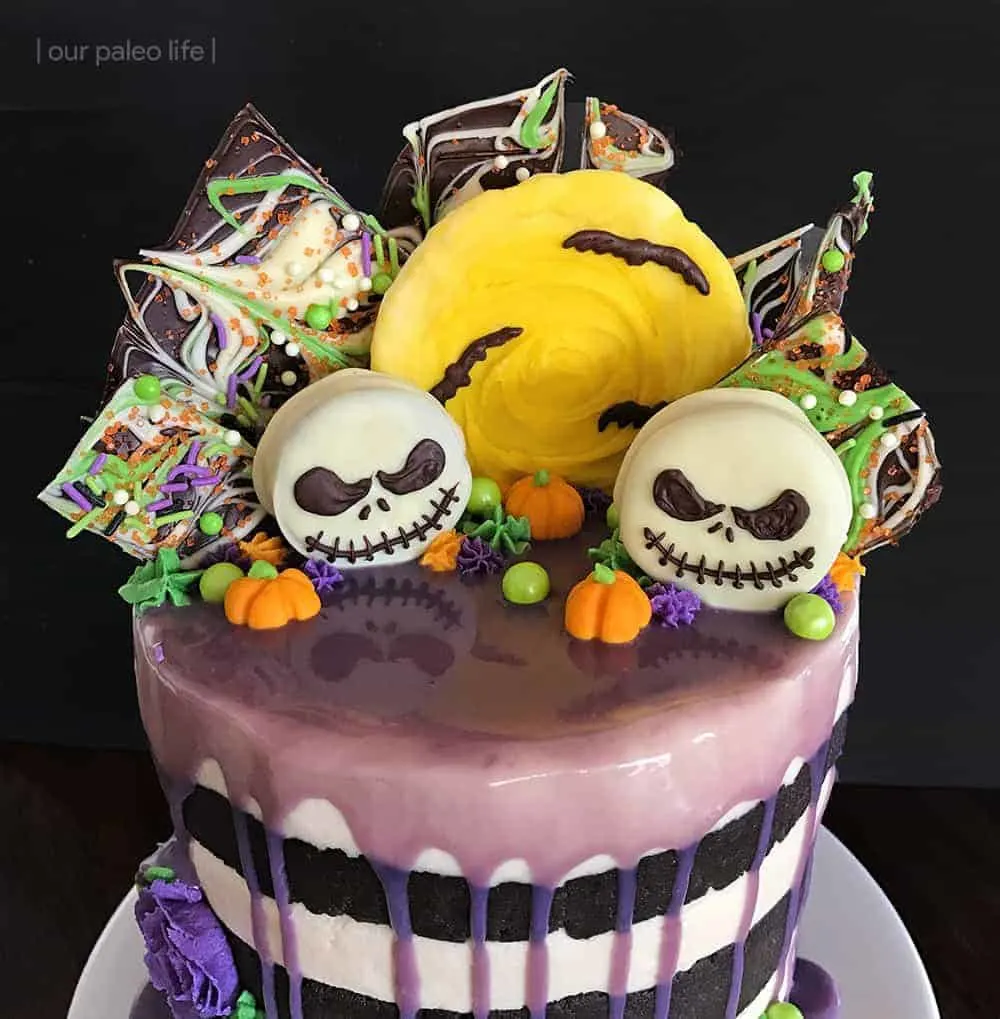
So when my oldest child requested a Tim Burton inspired cake for her 12th birthday this year (which happened to fall on Friday the 13th and she’s a huge Tim Burton fan), complete with a drawing to show me exactly how it should look, I had to oblige. Not to mention, I really just wanted an excuse to make a fun cake, because I enjoy it and don’t have the opportunity too often.

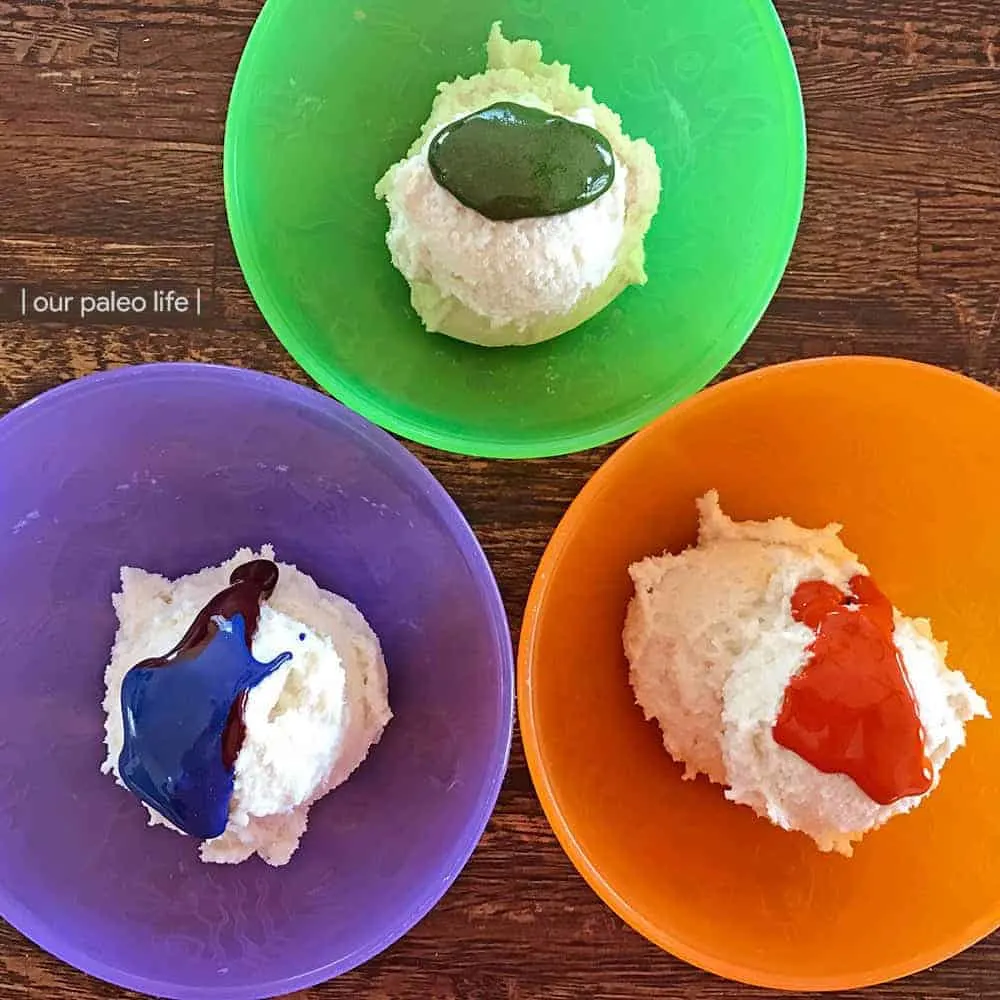
The problem I have with these “fun” cakes is that I want lots of color but don’t want to use artificial coloring. Thank goodness for Color Kitchen Foods! I found them via Thrive Market last year and bought a few packets to try out, but then they just sat in the pantry because I was afraid to use them (I honestly don’t know why I was afraid).
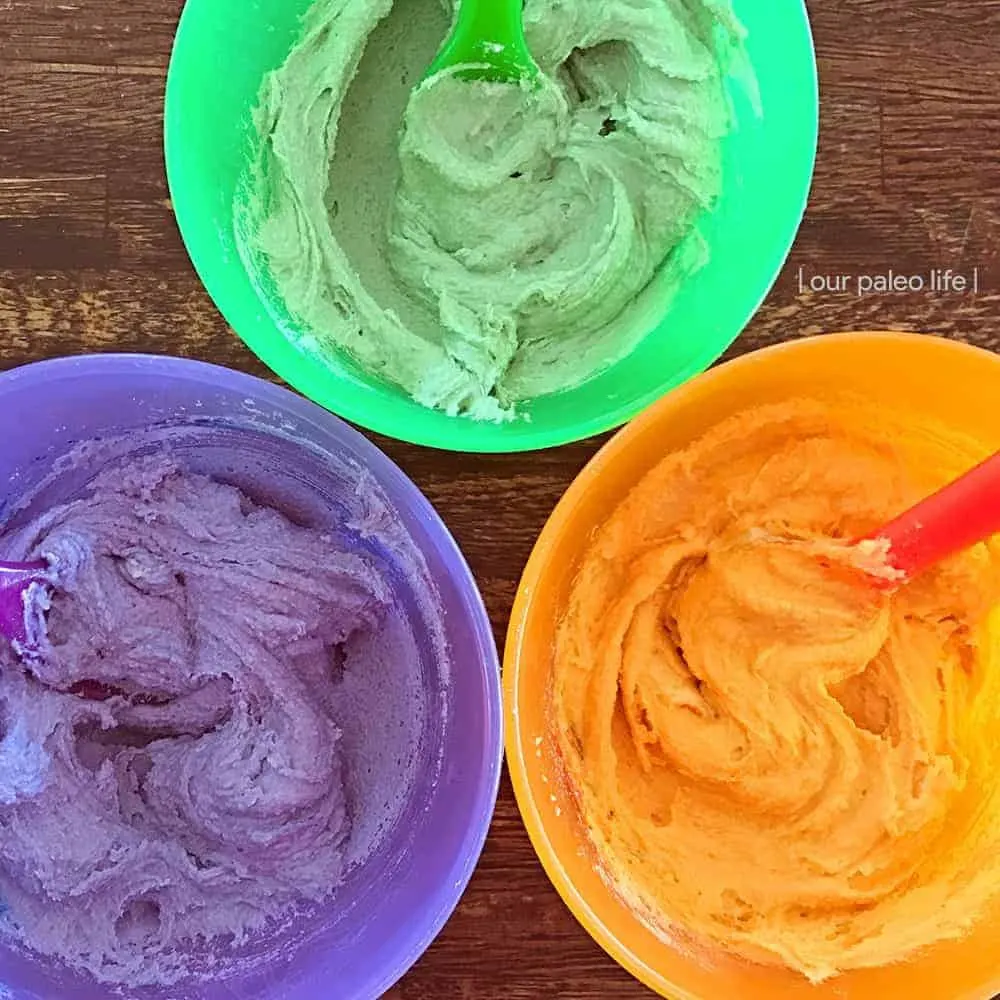
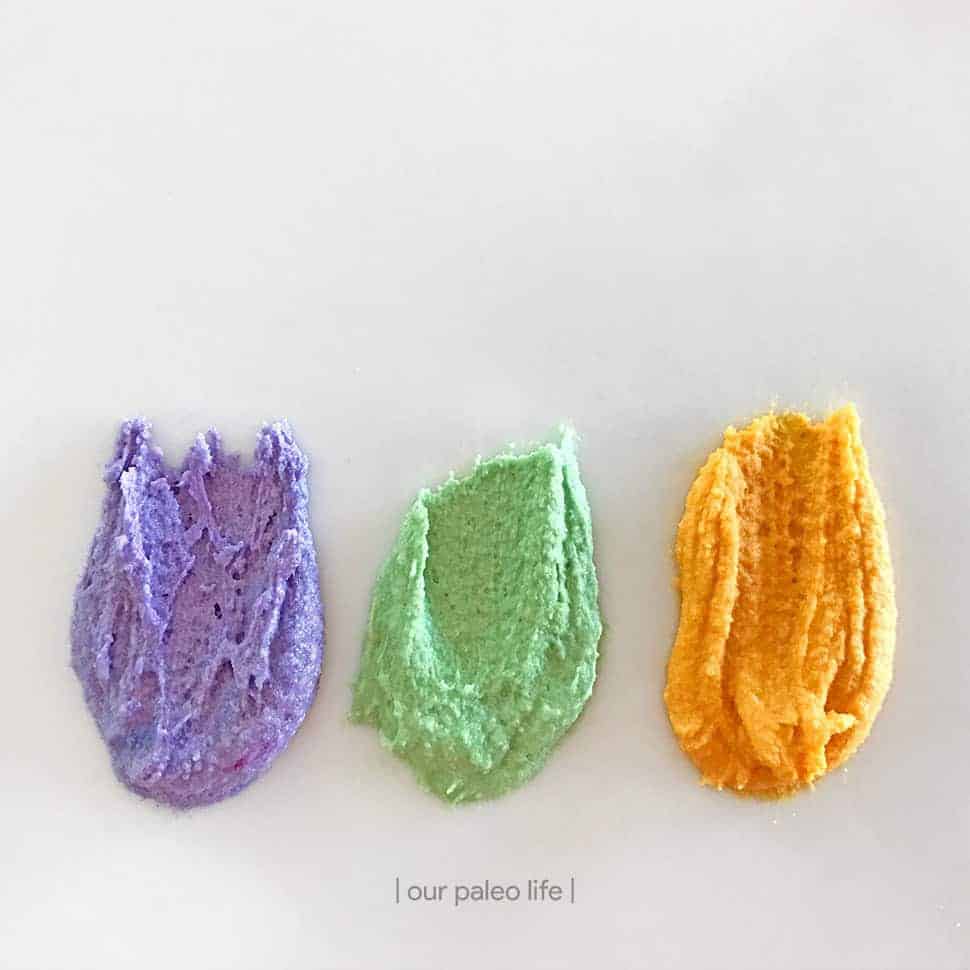
But knowing that this cake was so important to my daughter, I got over it and gave the colors a shot. I found that the key to getting the colors to mix consistently was to create a gel. Color Kitchen suggests mixing their color powders with glycerine to form a gel that mixes perfectly with oil-based foods (like the frosting you see below). They were right, and I couldn’t believe how vibrant the colors were. And they just got more vibrant overnight! Check the contrast between the finished cake photos (above) and the frosting in the bowls below (especially the purple). Much brighter and more vibrant and I love it!


I used alternating layers of my favorite chocolate cake recipe and a new pumpkin spice cake (recipe below), covered in a rich buttercream frosting. And then it was on to the best part: the decorating. Just so you know, I watch far too many cake decorating videos on Instagram, which feed my need to make cakes like this. I took quite a few cues from the designs and tutorials I see there, but took some creative license to get this made the way my daughter wanted.
I tried to keep this as close to paleo/primal as possible, but there really aren’t any good dairy-free white chocolate options out there, and because of that, many of the decorations are not dairy-free as well. I’ve got plans to make my own dairy-free white chocolate but it wasn’t ready in time for this cake.


I loved how the Color Kitchen colors really brought the design to life. I was expecting somewhat muted colors in everything, a little more earthy as you might expect with natural coloring, but I still can’t get over how vibrant it all was. And the look on my daughter’s face when she came home from school that afternoon to see this sitting on the counter, waiting for her. Just priceless.

While the cake itself isn’t necessarily a time consuming project, the accents and decorations were since I was learning as I went as well as adjusting my original plans with what I had available and the limited timeline I was facing. But I think that’s the beauty in cake design. You might hit roadblocks and have to backpedal in a different direction, but that’s what makes them all unique. I don’t assume that if/when you attempt this cake design that it will look exactly like this one, because it will be uniquely yours. And please, please tag me in your photos if you do make it! I can’t wait to see it!


And see these cake pops here? Another completely unplanned part of the cake. After the party (it’s surprisingly fun to have a house full of giggly preteen girls), there were about 2 slices of cake leftover. And they weren’t pretty either, just kind of toppled over after the mad dash to get cake after hours of running around and jumping on the trampoline. So I threw them in a large bowl, frosting and all, and mashed them up. I refrigerated the mixture to let it firm up then scooped it into balls using my little cookie scoop, rolled them smooth, and dipped them in some leftover chocolate. Voila, treats for my youth class at church the next day with hardly any extra effort.
I wish I had some leftover colored chocolate to drizzle on the cake pops, that would have been super fun-looking!

Moral of the story, go with the flow. Don’t get discouraged by things that might not go 100% according to plan. And keep a stash of Color Kitchens food coloring in your pantry in case you get a request for a crazy fun cake and need to color it up a bit. Happy cake baking!
PS: don’t be scared off by the length of the written recipe(s). I really just wanted to be as thorough as possible so you could “see” how I made this, step-by-step.
PSS: Color Kitchen Foods did not provide me with product or pay me for this post. My opinions are mine and mine alone. When I find a product I love I want to share it with you so you are aware that such greatness exists. Seriously, try them out, you’ll love them too!

Halloween Layer Cake (Chocolate & Pumpkin Spice)
Ingredients
- 1 batch Grain-Free Chocolate Mud Cake
Pumpkin Spice Cake
- 1 1/3 cups (165g) Cassava Flour
- 1/2 Tbsp White Vinegar
- 1 tsp Baking Soda
- 1 Tbsp Pumpkin Pie Spice
- 1/2 cup Maple Sugar
- 1/2 cup Coconut Sugar
- 1/4 tsp Salt
- 6 Tbsp Grass-Fed Butter or Ghee, cut into Tbsp portions, room temperature
- 2 Eggs
- 2 Tbsp Avocado Oil
- 1/2 (15 oz) can Pumpkin Puree, not pumpkin pie filling
- 1/4 cup Unsweetened Dairy-Free Milk, we prefer almond or cashew
- 1/2 tsp Pure Vanilla Extract
Vanilla Buttercream
- 2 cup (4 sticks) Grass-Fed Butter or Spectrum Shortening (for dairy-free), room temperature
- 6 cups Pure Cane Sugar
- 6 Tbsp Arrowroot or Tapioca Starch
- 1/2 tsp Salt
- 2 Tbsp Heavy Whipping Cream or Coconut Cream (for dairy free)
- 3 tsp Pure Vanilla Extract
Black Buttercream
- 1 cup (2 sticks) Grass-Fed Butter or Spectrum Shortening (for dairy-free), room temperature
- 3 cups Pure Cane Sugar
- 3 Tbsp Arrowroot or Tapioca Starch
- 1/2 tsp Salt
- 3 Tbsp Heavy Whipping Cream or Coconut Cream (for dairy free)
- 3 tsp Pure Vanilla Extract
- 1/4 cup Black Onyx Cocoa Powder
- 2 capsules Activated Charcoal
Purple Slime (White Chocolate Ganache)
- 1 cup Heavy Whipping Cream or Coconut Cream (for dairy free)
- 2 cups White Chocolate, (this is not paleo or dairy-free)
- Color Kitchen Foods Red Color
- Color Kitchen Foods Blue Color
- Glycerine
Decorations
- Enjoy Life Dark Chocolate Chunks
- White Chocolate, (this is not paleo or dairy-free)
- Color Kitchen Foods 5-pk Food Colors
- Green/Purple/White Sprinkles
- Additional Cane Sugar
- Glycerine
Instructions
Grain-Free Chocolate Mud Cake
- Prepare the cake as listed here. Fill three 6" cake pans equally and bake as directed. Set aside and cool, then carefully remove from pan and let cool completely on a wire rack.
Pumpkin Spice Cake
- Preheat oven to 350°F. Lightly grease two 6" cake pans with coconut oil, cut a parchment circle to fit the bottom of the pan, place it in the pan, and lightly grease that as well. Set aside.
- In a large mixing bowl, add the cassava flour, vinegar, baking soda, pumpkin pie spice, maple sugar, coconut sugar, and salt. Using a stand mixer or hand mixer on low speed, blend for about 30 seconds or until everything is well combined.
- Add the butter/ghee a few chunks at a time. Mix until the dry ingredients are combined with the butter and look like coarse sand, scraping the sides of the bowl as needed. The mixture should stick together a bit if you try to pinch it together.
- In a separate bowl, combine the eggs, oil, pumpkin, milk, and vanilla. Whisk until combined and smooth and set aside.
- With the mixer on low speed, very slowly add 1/2 of the egg mixture to the flour mixture. Increase the speed to medium for 2 minutes. Scrape bottom and sides of the bowl. Add 12 of the remaining egg mixture and beat for about 30 seconds. Add the remaining egg mixture and beat another 30 seconds.
- Pour the batter evenly between the prepared cake pans and bake in the preheated oven for for 30-35 minutes, or until a toothpick inserted in the center comes out clean. Cool in pans for about 10 minutes then invert onto a wire rack, remove pans, and cool completely before frosting.
Powdered Sugar
- Use all the sugar for both buttercream recipes so you only have to do this process once.
- In a food processor or high powdered blender (I use my Blendtec for this and it's done in under 15 seconds), Add 1/3 of the sugar and half of the arrowroot. Blend on high speed until the pitch of the blender changes and the sugar has turned to powder. This shouldn't take long and you don't want to melt the sugar by running the blender too long. Repeat 2 more times with the remaining sugar/starch. Set aside.
Vanilla Buttercream
- In the bowl of a stand mixer fitted with the paddle attachment, beat the butter/shortening on a medium speed for 30 seconds, until smooth. Slowly add in the powdered sugar, 1 cup at a time. Alternate with small splashes of cream.
- Once fully mixed, add in the vanilla and salt, and beat on medium low until the ingredients are fully incorporated, and the desired consistency is reached. If the frosting is too thick, add in cream (1 teaspoon at a time). If the frosting is too thin, add in more powdered sugar (quarter of a cup at a time).
- Some of this frosting will be used with the Color Kitchen Food Colors for the accents, so it's best prepared the night before so the colors have time to intensify overnight.
Black Buttercream
- In the bowl of a stand mixer fitted with the paddle attachment, beat the butter/shortening on a medium speed for 30 seconds, until smooth. Slowly add in the powdered sugar, 1 cup at a time. Alternate with small splashes of cream.
- Once fully mixed, add in the vanilla and salt, and beat on medium low until the ingredients are fully incorporated, and the desired consistency is reached. If the frosting is too thick, add in cream (1 teaspoon at a time). If the frosting is too thin, add in more powdered sugar (quarter of a cup at a time). Once fully mixed, add in the black onyx cocoa and the contents of the charcoal capsules (not the actual outer capsules themselves). Slowly mix to fully incorporate without adding in too much extra air.
- The longer this frosting sits, the darker the color will get, so it's best prepared the night before.
Colored Frosting
- Place the contents of all 5 Color Kitchen Food Color packets in 5 separate bowls. Add a small amount of glycerine to each bowl and stir to combine fully until you get a thin gel paste.
- Put about 1/2 cup of white frosting in 3 bowls (1/2 cup in each bowl). Add orange gel to one, green to another, and both red and blue in the last. Don't use all the coloring, maybe just 1/4 of it. Stir each bowl of frosting separately until the colors are completely combined and smooth. Remember they will darken as they sit overnight, but if they are too light, add just a touch more gel and mix again.
- Place each of the colored frostings in their own piping bags, twist and seal the ends, and set aside until it's time to use them.
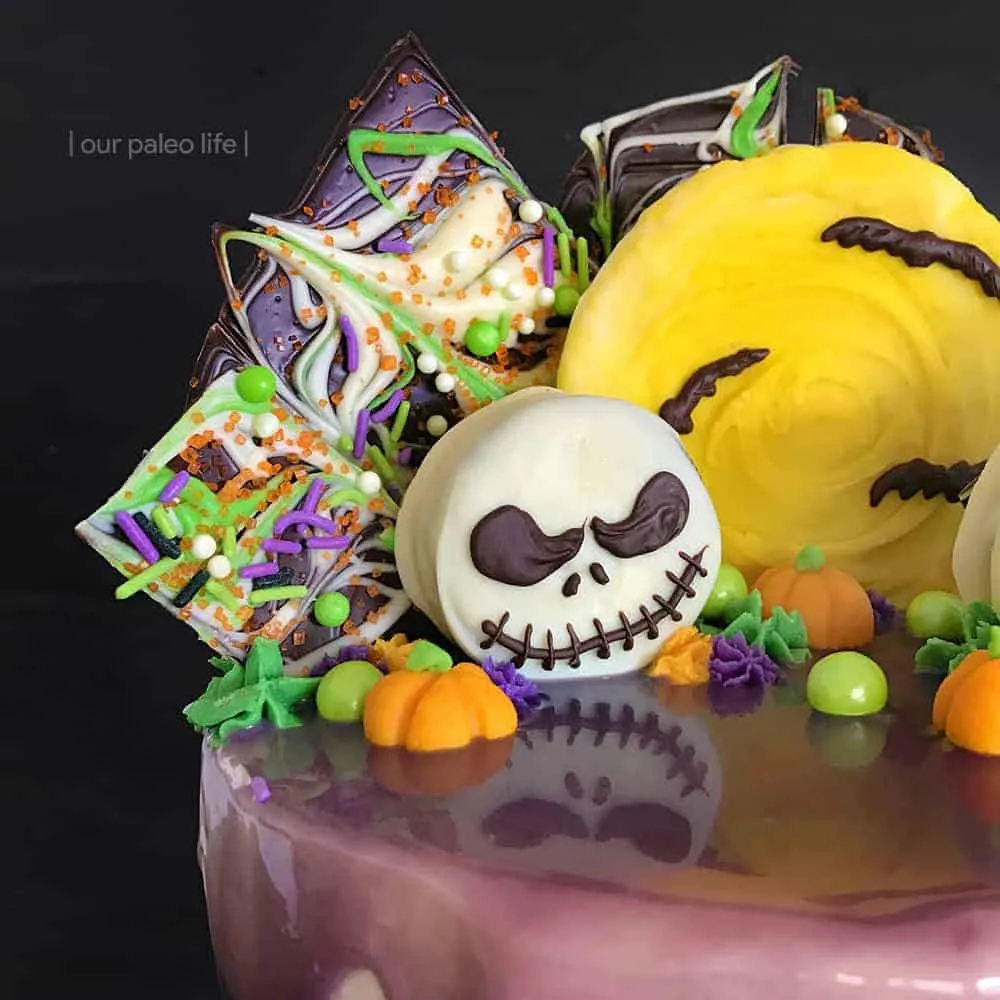
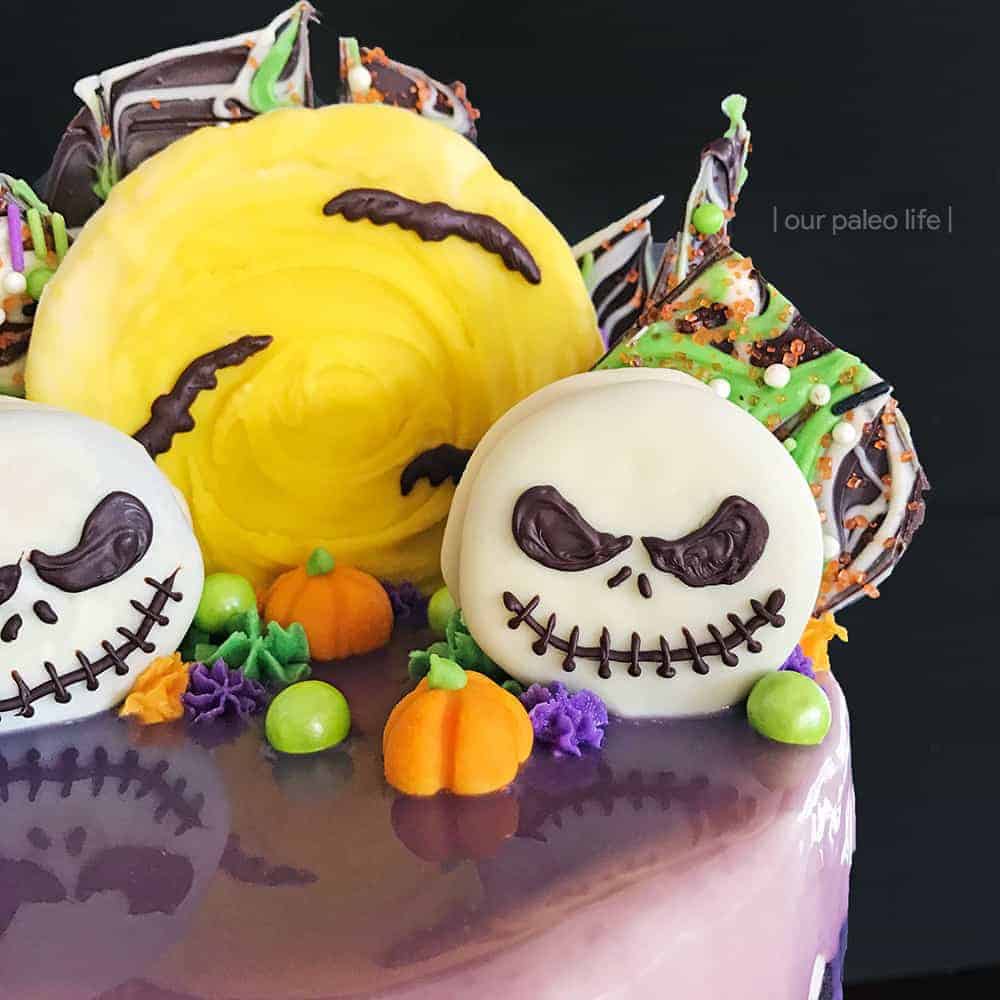
Marbled Chocolate Bark & Mini Pumpkins
- Add about a 1/4 cup of the cane sugar to a jar, container, or bag that can be tightly sealed. Add a drop of the orange Color Kitchen gel you prepared for the frosting, seal the container tight, and shake shake shake until the sugar turns orange. Set aside.
- In separate bowls, melt 1 cup of the Enjoy Life Dark Chocolate and 2 cups of the white chocolate. Microwave in 30 second intervals at 50% power, stirring in between each interval, until fully melted. Let cool slightly (it shouldn't be hot to the touch).
- Once the white chocolate is cool, divide it into quarters. In one of those quarters, add about 1/8 tsp of the green Color Kitchen gel you prepared for the frosting. Very slowly mix it in. White chocolate is very finicky and can seize up easily. Stir gently until smooth.
- In another 1/4 of the white chocolate, add about 1/8 tsp of the orange Color Kitchen gel you prepared for the frosting. Add this in as fast as you want, you want the chocolate to seize up. When it does, take small chunks of the now-moldable orange chocolate and roll into balls. Using a toothpick, form ridges to make it look like a pumpkin. Add a dab of the green white chocolate to the top for a stem. Set aside.
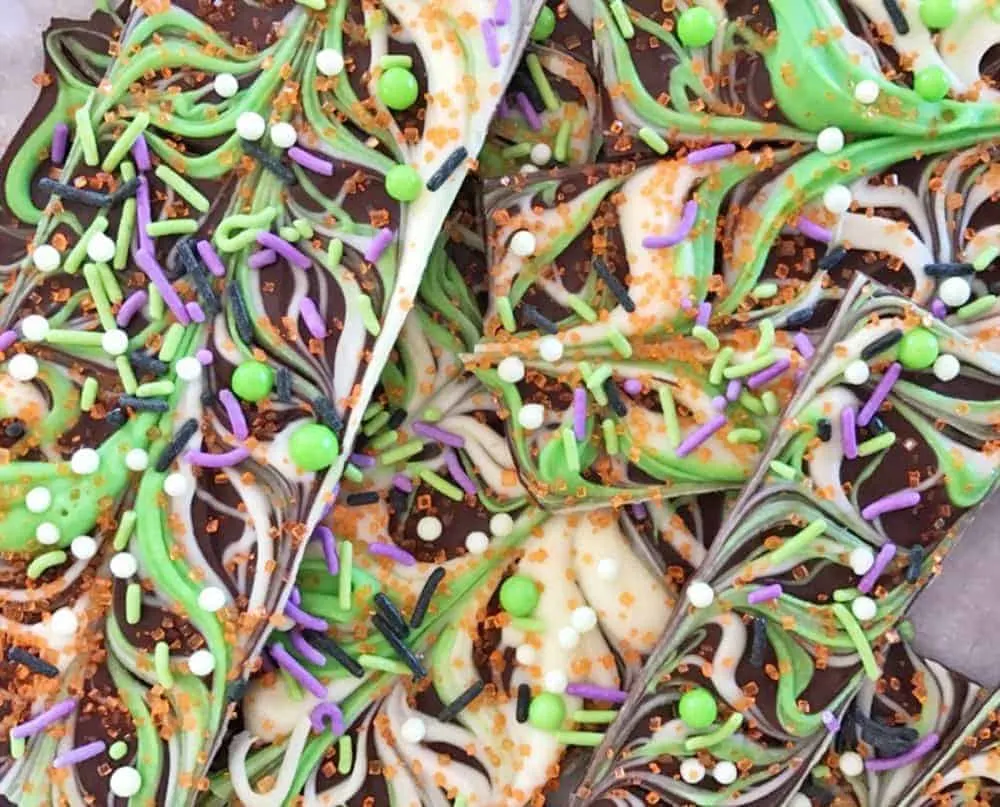
- On a baking sheet covered with parchment paper, spread all the melted dark chocolate in a thin layer (but not so thin that you can see through it). Drizzle 1/4 of the white chocolate over the dark chocolate, and the green-tinted chocolate over that. Use a toothpick to gently marble the surface, running it back and forth in swirling patterns. Quickly add sprinkles and the orange-tinted cane sugar over the entire surface. Place the pan in the fridge or freezer to harden. Once ready to use, cut into large geometric shapes (tall triangles work best) with a very sharp knife. Set aside.
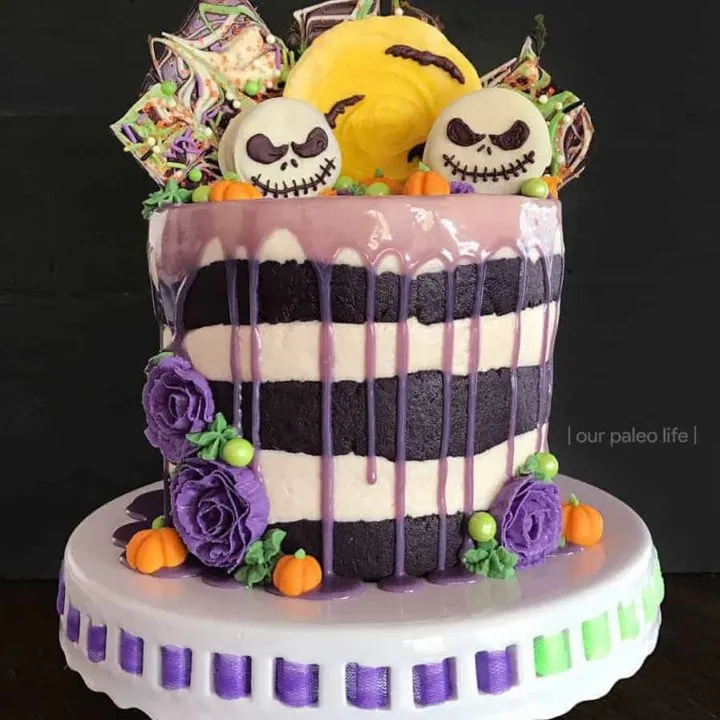
- In the remaining 1/4 of the white chocolate, add about 1/8 tsp of the yellow Color Kitchen gel you prepared for the frosting. Very slowly mix it in, but not all the way (leave it a little marbled). On a small piece of parchment paper, trace the bottom of one of the 6" cake pans. Flip the parchment over so the ink won't touch the chocolate. Spread the yellow-tinted chocolate into a 6-inch circle. As it cools, continue to spread it with the back of a spoon to get a swirl effect. Place in the fridge or freezer to harden.
Cake Assembly
- Place the White Buttercream in a large piping bag and the Black Buttercream in a separate piping bag. Cut off about 1/2" of the tip. No need for a special tip on the bag.
- Place a layer of chocolate cake on your cake stand. Pipe some white buttercream on top and smooth it out, overlapping the edge slightly. Place a pumpkin cake layer on top of the frosted chocolate layer. Pipe some white buttercream on top and smooth it out, overlapping the edge slightly. Repeat with the remaining 3 cake layers, alternating between chocolate and pumpkin.
- Spread a thin layer of white buttercream over the sides and top of the cake (the crumb coat). At this point it will look like a naked cake. Set in the fridge to allow the crumb coat to firm up, about 15 minutes.
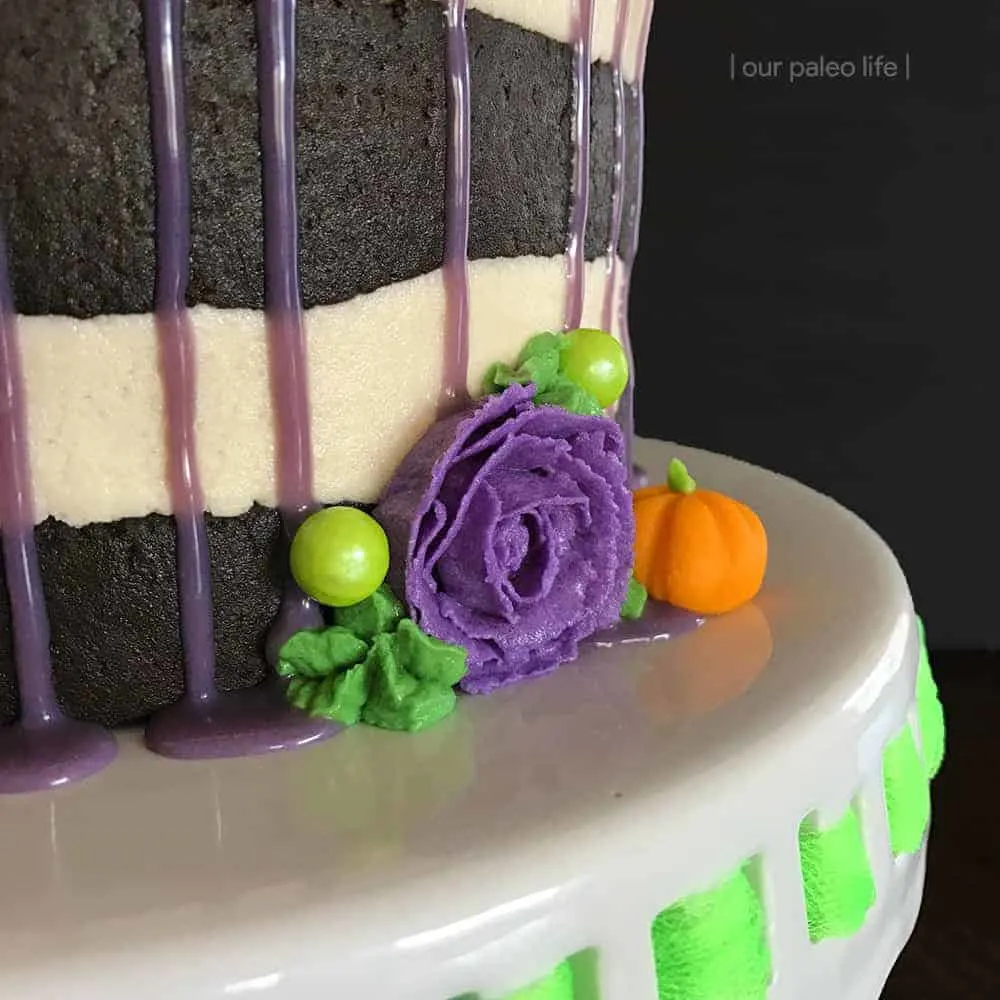
- Once the crumb coat is set, pipe alternating rows of white and black buttercream around the cake until you reach the top. Using a bench scraper pressed against the frosting at a 45° angle, smooth the frosting all the way around the cake. Coat the top with white frosting, using an offset spatula to smooth it out.
- *NOTE* If your frosting is too thick, the bench scraper method may not work well. To get the uneven stripes shown in these pictures, I placed a Viva paper towel on the frosting and gently smoothed it with my hands. This flattened the sides but kept the integrity of the uneven stripes.
- Place the frosted cake back in the fridge to allow the frosting to cool and firm up (about 20 minutes) in preparation for the ganache.
Purple Slime (White Chocolate Ganache)
- Add the white chocolate chips and cream in a heat-safe mixing bowl. Microwave at 50% for 1 minute. Stir. Continue heating at 50% power in 30 second intervals until fully melted. Stir in equal parts red and blue Color Kitchen gel colors until you achieve the right purple color. Let cool slightly so it's not so thin when you pour it on the cake.
Cake Decoration
- Place different closed star tips on the orange, green, and purple frosting bags you prepared the day before. Set aside.
- Remove the frosted cake from the fridge and pour some of the purple ganache on top of the cake. With a spoon, gently push it over the edges to form the drips down the sides. Add more to the top as needed to get all the drips and to evenly coat the top.
- Remove the yellow moon from the parchment and place it the middle of the cake, slightly off-center to the right. Both behind and to the side of it, add the marbled bark in random places. Around the contact points (where the bark/moon are placed in the cake), pipe random stars/flowers/swirls of orange, green, and purple frosting.
- Pipe random stars, flowers, and swirls around the bottom and slightly up the sides of the cake. Set the white chocolate pumpkins around and add a few more sprinkles as well.
- You are finally done! To serve, cut the cake into 8 slices and then cut each slice in half (so someone gets a top piece and someone gets a bottom piece). This is the easiest way to serve it since the slices are so tall and tall/narrow wedges can topple easily.
Notes
- To get flat-topped cakes without trimming, I like to use cake pan strips. If you don't have these, cut an old towel into strips that will fit around your pans, soak them in ice cold water, wring out the excess, and pin around the outside of the pan with metal binder clips just before placing the pans in the oven.
- Alternately, when the cakes come out of the oven, place a round of parchment over the top while the cake is still hot and gently press down the top to flatten it. Cover the parchment with a dish towel to burning yourself, if necessary.
- The decoration notes are more of a guide than a steop-by-step. Make this cake your own with what you have available.